Lessons Learned After Finally Configuring a Raspberry Pi CM4 Mini Router (Bought in 2022) Product Mini Router built with Raspberry Pi Compute Module 4 Dual Gigabit Ethernet NICs 4GB RAM / 32GB eMMC Pre-installed OpenWrt Compact form factor, fanless, low power Background: A Device That Waited Its Turn I bought this device back in 2022 . At the time, it looked like the perfect small router: Raspberry Pi Compute Module 4 Dual Ethernet ports OpenWrt already installed No SD card required thanks to eMMC But like many homelab projects, it ended up sitting on a shelf . Fast forward to today — with more networking experience, a clearer home network plan, and a real need for a flexible router — I finally decided to configure it properly. That’s when the real journey started. What I Expected (Even in 2025) Even knowing this wasn’t a consumer router, I still expected: Plug WAN into my upstream router Plug LAN into my laptop Access 192.168.1.1 Hav...
Posiblemente saben que la documentación esta en la pagina web de pintos.
Pero tenemos dudas, al momento que seguimos la instrucciones. Este tutorial esta basado en Ubuntu 10.04, en mi opinión personal no importa la versión de Ubuntu, o cualquier distribución basada en debian debería de funcionar. Si lo prueban me avisan.
.
Paso 1. Vamos a instalar unas cosas, para eso vamos a usar la terminal y escribimos los siguientes comandos
- sudo apt-get install xserver-xorg-dev xorg-dev
- sudo apt-get install wx-common wx2.8-headers libwxbase2.8-0 libwxgtk2.8-dev
- sudo apt-get install libncurses5-dev
Paso 3. En la casilla de buscar, escribimos las siguientes librerias, y le damos instalar a cada una de ellas.


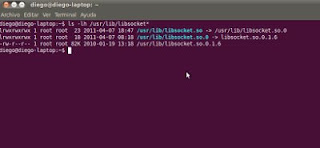
Paso 4. IMPORTANTE Hya un problema al momento cuando instalamos libsocket. Tenemos que hacer un linkeo. ¿Porque? Pintos la busca en otro lugar, y nuestro sistema la puso en otro. Entonces en la terminal escribimos el siguiente codigo
- sudo ln -s /usr/lib/libsocket.so.0 /usr/lib/libsocket.so
- Para verificar si esta bueno, escribimos en la terminal ls -lh /usr/lib/libsocket*
Paso 5. Descargamos el bochs version 2.2.6. Aqui.
Descargamos el pintos. AQUI Lo descomprimos.
Lo descromprimos. En la terminal nos movemos a la carpeta donde lo tenemos instalado y vamos a parchear el pintos.
En la carpeta de bochs escribimos el siguiente comando
Paso 6. Y ahora seguimos con el pintos
Le damos un cd a la carpeta de pintos
Comentarios
Descargamos el pintos. AQUI Lo descomprimos.
Lo descromprimos. En la terminal nos movemos a la carpeta donde lo tenemos instalado y vamos a parchear el pintos.
- cd /directorio/bochs-2.2.6
- IMPORTANTE PINTOSDIR es la direccion donde descomprimos el pintos, no lo vayan a pegar, tienen que poner la direccion de la carpeta pintos.
patch -p1 < $PINTOSDIR/src/misc/bochs-2.2.6-big-endian.patch
patch -p1 < $PINTOSDIR/src/misc/bochs-2.2.6-jitter.patch
patch -p1 < $PINTOSDIR/src/misc/bochs-2.2.6-triple-fault.patch
patch -p1 < $PINTOSDIR/src/misc/bochs-2.2.6-ms-extensions.patch
patch -p1 < $PINTOSDIR/src/misc/bochs-2.2.6-solaris-tty.patch
patch -p1 < $PINTOSDIR/src/misc/bochs-2.2.6-page-fault-segv.patch
patch -p1 < $PINTOSDIR/src/misc/bochs-2.2.6-paranoia.patch
patch -p1 < $PINTOSDIR/src/misc/bochs-2.2.6-solaris-link.patch
En la carpeta de bochs escribimos el siguiente comando
- ./configure --enable-gdb-stub --with-x --with-x11 --with-therm --with-nogui
- make
- sudo make install
Paso 6. Y ahora seguimos con el pintos
- Entramos a la carpeta donde tenemos pintos. y hacemos un cd
cd /directorio/pintos/src/utils - make
- sudo cp backtrace /usr/bin
- sudo cp pintos /usr/bin
- sudo cp pintos-gdb /usr/bin
- sudo cp pintos-mkdisk /usr/bin
- sudo cp pintos-set-cmdline /usr/bin
- sudo cp squish-pty /usr/bin
- sudo cp squish-unix /usr/bin
- sudo cp Pintos.pm /usr/bin
- sudo chmod +rx /usr/bin/pintos
Le damos un cd a la carpeta de pintos
- cd /directoriopintos/threads
- make
- esto nos crea una carpeta build.
- cd build
- y corremos el siguiente ejemplo
pintos run alarm-multiple - Esto nos deberia de mostrar una imagen como la siguiente

Comentarios
Comentarios
Publicar un comentario